Battery switch on travel trailer function is crucial for safe and efficient power management. Understanding how your battery switch works, from its various types (single-pole, double-pole, etc.) to its role in connecting and disconnecting your batteries, is key to avoiding costly mistakes and ensuring a smooth camping experience. This guide breaks down everything you need to know, from basic operation to troubleshooting and maintenance.
We’ll explore the inner workings of different switch types, providing clear comparisons and illustrations to help you visualize how they function within your travel trailer’s electrical system. We’ll cover safe battery handling procedures, common problems and solutions, and even offer tips on upgrading or replacing your switch if necessary. Get ready to become a travel trailer power pro!
Battery Switch Types in Travel Trailers

Choosing the right battery switch for your travel trailer is crucial for managing your power sources and preventing accidental drain or damage. Understanding the different types available helps you make an informed decision based on your specific needs and setup. This section will explore the common types, their internal workings, and their advantages and disadvantages.
Single-Pole Battery Switches
A single-pole switch is the simplest type. It’s essentially an on/off switch for a single power source, typically your house battery. This means you can disconnect the house battery from the trailer’s electrical system completely.
| Component | Description |
|---|---|
| Switch Lever | Moves to connect or disconnect the battery circuit. |
| Contacts | Metal pieces that make or break the electrical connection. |
| Housing | Protective casing for the internal components. |
Advantages: Simple, inexpensive, easy to install.
Disadvantages: Only controls one battery; offers no isolation between batteries or charging sources.
So, you’re gearing up for a road trip? Awesome! First things first: make sure your travel trailer’s power is sorted. Check out this guide on the battery switch on travel trailer function to avoid any dead-battery surprises. Once that’s done, let’s talk tunes! For the ultimate audio experience on the road, consider setting up an audiophile travel aetup – it’ll make those long drives way more enjoyable.
Seriously, good sound elevates the whole trip.
Double-Pole Battery Switches
A double-pole switch controls two separate circuits simultaneously. In a travel trailer, this usually means controlling both the house battery and the chassis battery (used for starting the vehicle). Flipping the switch to the “off” position disconnects both batteries from the trailer’s electrical system.
| Component | Description |
|---|---|
| Two Switch Levers (or a single lever controlling two poles) | Each lever controls a separate circuit (one for each battery). |
| Two Sets of Contacts | One set for each battery circuit. |
| Housing | Protective casing for the internal components. |
Advantages: Controls two batteries simultaneously, offering more comprehensive power management.
Disadvantages: Still doesn’t allow for charging one battery while the other is disconnected.
So, you’re hitting the road in your travel trailer? Awesome! First things first: learn how to properly use your battery switch. Check out this guide on the battery switch on travel trailer function to avoid any dead battery surprises. Once you’ve mastered that, it’s time to think about entertainment. If you’re an audiophile, setting up your sound system is crucial.
A killer audiophile travel setup can make all the difference in enjoying those scenic drives and peaceful nights under the stars. Get those two things sorted and your trip will be smooth sailing!
Double-Pole Double-Throw (DPDT) Battery Switches, Battery switch on travel trailer function
This is the most sophisticated type. A DPDT switch allows for connecting either the house battery or a second battery (like a starting battery) to the trailer’s electrical system, while completely isolating the other. It also allows for a completely “off” position, disconnecting both batteries. Think of it as having three positions: House Battery, Second Battery, and Off.
| Component | Description |
|---|---|
| Switch Lever | Moves to select between House Battery, Second Battery, or Off positions. |
| Three Sets of Contacts | One set for each battery and one for the “off” position. |
| Internal Mechanism | A more complex mechanism to switch between three positions safely. |
Advantages: Offers the most control, allowing for charging one battery while using power from the other; provides complete isolation for safety.
Disadvantages: More complex and expensive than other types; requires more careful installation.
Connecting and Disconnecting Batteries: Battery Switch On Travel Trailer Function
Properly connecting and disconnecting your travel trailer batteries using a battery switch is crucial for safety and maintaining the lifespan of your battery system. A battery switch allows you to easily isolate the batteries from the trailer’s electrical system, preventing accidental drain and potential damage. This section will guide you through the process.Connecting and disconnecting your batteries involves a few simple steps, but safety is paramount.
Always prioritize safety to prevent injury or damage to your equipment.
Safe Battery Connection Procedure
Before beginning any work on your battery system, always disconnect the negative (-) terminal first. This prevents accidental shorts and protects you from electrical shocks. Here’s the step-by-step procedure for safely connecting your batteries using a battery switch:
- Ensure the switch is in the “OFF” position. This is vital to prevent accidental shorts during connection.
- Locate your battery switch and battery terminals. Familiarize yourself with the wiring diagram before proceeding.
- Connect the positive (+) cables first. Securely attach the positive cable from your battery to the corresponding terminal on the battery switch, ensuring a tight connection.
- Connect the negative (-) cables. Similarly, connect the negative cable from your battery to the negative terminal on the battery switch. Make sure the connection is secure.
- Double-check all connections. Verify that all cables are securely fastened and there are no loose wires or exposed terminals.
- Turn the switch to the “ON” position. Now your batteries are connected and ready to power your travel trailer.
Safe Battery Disconnection Procedure
Disconnecting your batteries is equally important, especially before prolonged storage. The procedure is essentially the reverse of connecting them, but safety precautions remain crucial.
- Turn the battery switch to the “OFF” position. This isolates the batteries from the electrical system.
- Disconnect the negative (-) cables first. Carefully remove the negative cable from the battery switch terminal.
- Disconnect the positive (+) cables. Next, disconnect the positive cable from the battery switch terminal.
- Store batteries properly. If storing for an extended period, consider using a battery tender to maintain charge and prevent sulfation.
Common Mistakes to Avoid
Understanding common mistakes helps prevent potential problems and ensures the longevity of your battery system.
Here are some common errors to avoid when working with your travel trailer’s battery system:
- Connecting the negative cable first: Always connect the positive (+) cable first and disconnect the negative (-) cable last.
- Loose connections: Ensure all connections are tight and secure to prevent arcing and corrosion.
- Ignoring corrosion: Clean battery terminals and connections regularly to maintain good electrical contact and prevent damage.
- Incorrect switch operation: Familiarize yourself with the operation of your specific battery switch before use.
- Working on a wet or damp surface: Always work in a dry area to prevent electrical shock.
- Improper storage: Store batteries in a cool, dry place to prolong their lifespan.
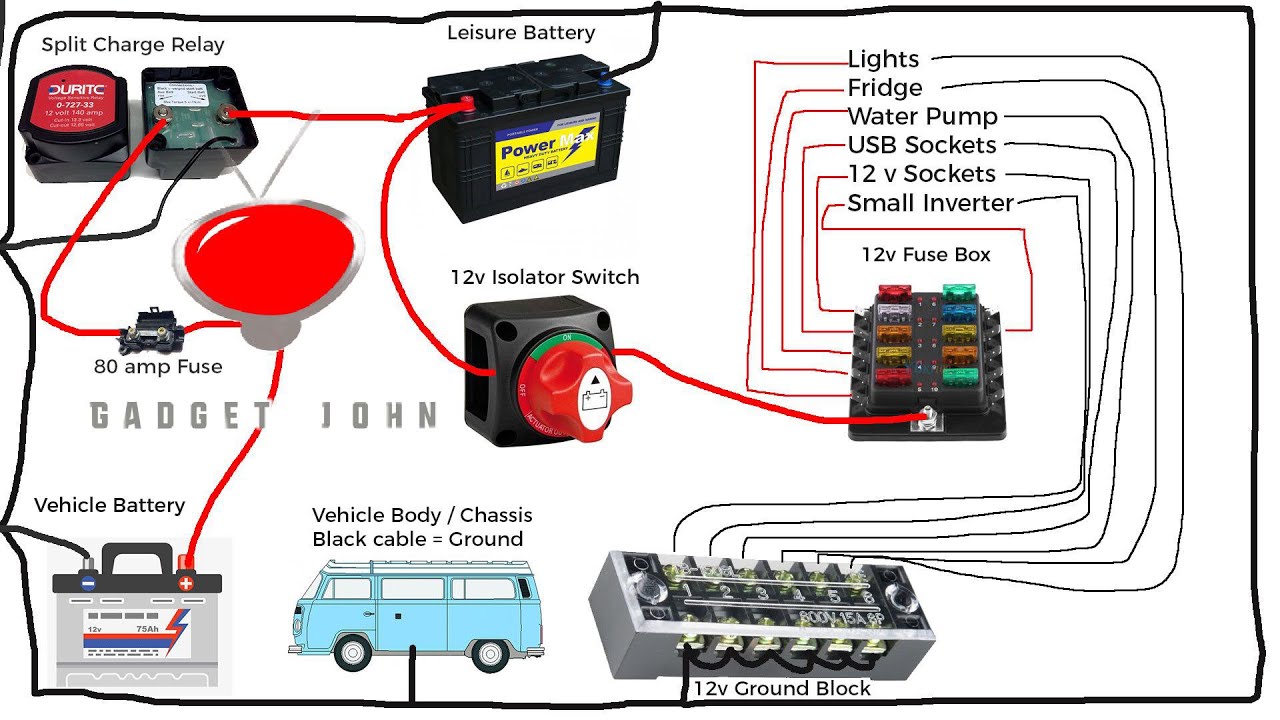
Typical Travel Trailer Battery System Wiring Diagram
The following describes a typical wiring configuration. Remember that variations exist depending on the specific setup of your travel trailer.
Imagine a rectangle representing the battery switch. On the left side of the rectangle, you see two large circles representing the positive (+) and negative (-) battery terminals. Thick lines connect the battery terminals to the corresponding terminals on the switch. From the other side of the switch, two more thick lines emerge. One, labeled “+”, leads to the positive bus bar (a thick metal bar connecting all positive components) of the trailer’s electrical system.
The other, labeled “-“, leads to the negative bus bar of the trailer’s electrical system. The bus bars then distribute power to various components like lights, appliances, and the 12V system.
A small circle with a “G” inside could be shown connected to the negative bus bar. This represents the ground connection, ensuring a complete electrical circuit and preventing stray voltage.
Finally, a small arrow pointing to the “OFF” and “ON” positions on the battery switch is included, indicating the direction to switch between connected and disconnected states.
Mastering your travel trailer’s battery switch is more than just knowing how to flip a switch; it’s about understanding your RV’s power system and ensuring its longevity. By following the safety guidelines, performing regular maintenance, and addressing issues promptly, you’ll enjoy reliable power and peace of mind on all your adventures. Remember, a little preventative care goes a long way in keeping your travel trailer running smoothly and safely.
General Inquiries
What size battery switch do I need?
The correct amperage rating depends on your battery bank’s capacity. Consult your trailer’s wiring diagram or a qualified electrician to determine the appropriate size.
How often should I clean my battery switch?
Inspect and clean your battery switch at least twice a year, or more frequently if exposed to harsh conditions.
My battery switch is making a clicking sound. What’s wrong?
This could indicate a loose connection, corroded terminals, or a failing switch. Inspect for visible damage and tighten connections. If the problem persists, replace the switch.
Can I use a battery switch with lithium batteries?
Some battery switches are compatible with lithium batteries, but others aren’t. Check the manufacturer’s specifications to ensure compatibility before installation.
